3 Tips to Drastically Reduce Site Load Time. Mine Dropped By 50%
If you are reading this post you probably already know that site speed is a ranking factor and beyond that it’s a huge player in whether your visitors will be happy.
Basically I look at it like this: Slow sites = unhappy visitors = higher bounce rates = worse rankings.
With just a few tweaks (2 of them very simple, and 1 a bit more involved) I was able to cut the load time in half.
My load time problem:
One of my client sites is very image heavy and uses 3rd party scripts (inquiry widgets, google maps, analytics, etc) which is fairly common with many sites. The load time was suffering due to the number of requests for images, css, js files due to wait times and transfer times.
I’m also not a designer or programmer although I have a little grasp of each. This client’s budget doesn’t allow for brining in someone to completely re-do the site (which, honestly is what it needs to truly be fast) so I had to find things that I could do myself. That does not include combining all the JS/CSS from various WordPress plugins or making any other kind of radical changes that might risk breaking the site functionality or display.
We are already using Cloudflare and a WP caching plugin, and those alone while helping weren’t providing as much benefit as I wanted.
How can you speed up your site’s load time?
Here’s 3 things that I implemented on a client site yesterday and made huge progress in speeding up the site. There are plenty of others because this can be a really deep and technical topic, but these 3 things alone made such a drastic impact for the site in question that I wanted to share them.
1. rel=”dns-prefetch preconnect”
Adding these simple lines to the site in the <head>…</head> section basically tells the browser to start looking up the DNS info and creating a connection to them. This way when the browser reaches the code that calls for the connection to those sites, that has already happened.
It’s kind of like if you’re an executive assistant and your boss says “head toward Starbucks, I’ll text you a list in a few minutes” so you can star heading that direction while the office is putting together a list of what they want. You can start heading that way instead of waiting for them. Exactly how this works with browsers, minus the coffee part. It improves efficiency.
Here’s how the code looks for this site after I added it.
Remember – this only helps if you tell the browser to do this first, before you load the other code from these domains, so do it towards the top of the <head> section.
<link rel=’dns-prefetch preconnect’ href=’//www.google-analytics.com’ />
<link rel=’dns-prefetch preconnect‘ href=’//www.google.com’ />
<link rel=’dns-prefetch preconnect’ href=’//ajax.cloudflare.com’ />
<link rel=’dns-prefetch preconnect‘ href=’//widgets.tokeet.com’ />
<link rel=’dns-prefetch preconnect‘ href=’//html5shim.googlecode.com’ />
<link rel=’dns-prefetch preconnect’ href=’//fonts.googleapis.com’ />
<link rel=’dns-prefetch preconnect‘ href=’//fonts.gstatic.com’ />
<link rel=’dns-prefetch preconnect’ href=’//maps.googleapis.com’ />
<link rel=’dns-prefetch preconnect‘ href=’//maxcdn.bootstrapcdn.com’ />
Why not rel=’preload’ instead? Because these aren’t files that need to be preloaded, it is just priming the connection to those servers. I’m using both dns-prefetch and preconnect because various browsers handle them separately.
If you want to get more granular about what they do and when to use them, see this excellent article. Warning – it’s a bit techy.
2. Add “async” to Script tags
Adding “async” to Script tags tells the browser to run them asynchronously which basically means to not try to run the script immediately. This way it can continue to load the rest of the HTML document and runs the script when it has the ability to. It helps to stop issues where the page is taking longer to display. This will let these 3rd party scripts run when the browser has already loaded the main HTML page and other resources.
Remember those 3rd party scripts I mentioned? Most of them were not being loaded asynchronously. This means the page wasn’t being displayed completely and it wasn’t interactive (users can’t use it) until these scripts were being executed.
Since I have a little less than zero control how their servers are set up, how busy those servers are (which affects how fast their scripts load) and in general anything else with these 3rd parties, I want to make sure that my page is as usable as possible regardless of the speed of theirs.
That’s where adding “async” to the script tag comes in. I did it like this:
<script async src=”https://widgets.3rdparty.com/script.min.js”></script>
Yep, that’s it. Just add “async” to it. You can do it for your own scripts and for 3rd parties. There are some scripts you may not want to do this to, for example if a script is instrumental in your site being usable and by adding this it creates undesirable behavior, then don’t do it.
3. HTTP/2 “Server Push”
The easiest way to explain how this works is that your server should know what additional resources the browser will request for a given page and send them without waiting for the browser to ask.
This is kind of like a waiter knowing that you will need silverware so instead of waiting for you to ask or going to the table with your food and no silverware only to make another trip, the server (ha, it’s a pun!) knows to bring the silverware with your food in the same trip. Again, efficiency!
To implement this you need to get under the hood a little and how you do it will depend on a number of things like the programming language or CMS your site uses. I went a bit further than what I would call simple, but you can pair this down so it only pushes the main resources such as CSS & JS file and logo/header images that all pages of your site use.
For my particular client site I also wanted to do this for images attached to a post because there are lots of images that are larger and a huge part of what people are visiting those pages for.
I also want to mention that you don’t want to do this on every single pageload because the browser caches files so by doing it you are pushing files they already have. How would you like the waiter to keep pushing silverware on you when you already have them and are trying to consume your food without unnecessary interruption? Yeah, I thought so.
So in order to not do that I set a cookie that expires in 30 days which is the same amount of time that I have set for the browser-cache expiration. If that cookie exists already then the server won’t try to force-feed these additional resources to the browser.
I went further to set the cookie per-URL so I know whether to send the images attached specific to that page or not. This may not be scalable for sites where you have a visitor going to many pages as it creates a lot of cookies, but if your site has lower pages per visitor, it may be something to consider.
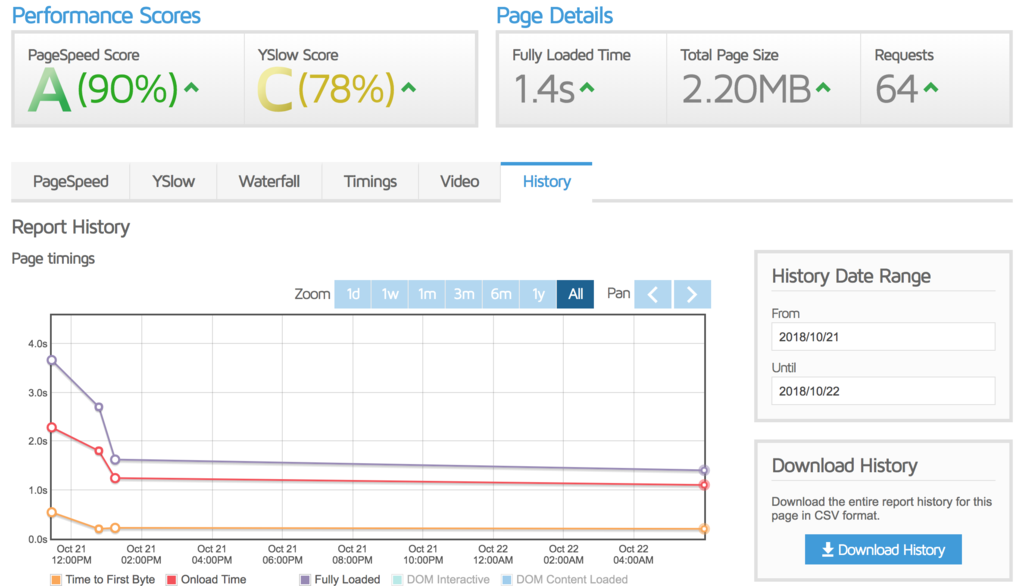
It’s worth nothing that the poor Yslow score is substantially influenced by:
- Cookies because I get an “F” grade for not using cookie-free domains.
- Not combining JS/CSS which is out of my risk tolerance for doing myself.
- No expires headers on the 3rd party scripts which are out of my control.
Obviously still some room for improvement, but everything else is pretty good.

How I added HTTP/2 Server Push to this WordPress site
I started with the code I found here and modified it slightly because I want to not only send the common files via Server Push, but also files that are relevant to a the other pages that are image heavy.
Here’s what I did.
In the theme’s header.php, I added this at the top, just below the comments and before anything else. I’ve left the comments in so you can use them to debug if necessary:
$cookieURL = “MYUNIQUESTRING” . $_SERVER[‘REQUEST_URI’];
//echo “<!– Set cookie: $cookieURL –>”;
//echo “<!– Get cookie: “;
//print_r($_COOKIE);
//echo “–>”;
if (is_first_time($cookieURL)) {
//echo “<!–prefetch –>”;
header(“Link: </wp-content/themes/mytheme/style.css>; rel=preload; as=style”, false);
header(“Link: </wp-content/themes/mytheme/theme_style.css>; rel=preload; as=style”, false);
header(“Link: </wp-content/themes/mytheme/library/css/admin_style.css>; rel=preload; as=style”, false);

header(“Link: </wp-content/uploads/2017/11/my-logo.png>; rel=preload; as=image”, false);
header(“Link: </wp-content/themes/mytheme/images/social/fb.png>; rel=preload; as=image”, false);
header(“Link: </wp-content/themes/mytheme/images/social/instagram.png>; rel=preload; as=image”, false);
header(“Link: </wp-content/themes/mytheme/images/footer-logo.png>; rel=preload; as=image”, false);

if (is_front_page()) {
//echo “<!–home sliders –>”;
header(“Link: </slider/1.jpg>; rel=preload; as=image”, false);
header(“Link: </slider/2.jpg>; rel=preload; as=image”, false);
header(“Link: </slider/3.jpg>; rel=preload; as=image”, false);
header(“Link: </slider/4.jpg>; rel=preload; as=image”, false);
header(“Link: </slider/5.jpg>; rel=preload; as=image”, false);

header(“Link: </wp-content/themes/mytheme/library/images/loading.gif>; rel=preload; as=image”, false);
header(“Link: </wp-content/themes/mytheme/images/dummy/booking-bg.jpg>; rel=preload; as=image”, false);
header(“Link: </wp-content/themes/mytheme/images/quotes.png>; rel=preload; as=image”, false);
header(“Link: </wp-content/themes/mytheme/images/slider-arrow.png>; rel=preload; as=image”, false);
}

if (is_single()) {
//echo “<!–single page images –>”;

header(“Link: </wp-content/themes/mytheme/images/dummy/s2.jpg>; rel=preload; as=image”, false);
header(“Link: </script.min.js>; rel=preload; as=script”, false);

$images =& get_children( array (
‘post_parent’ => $post->ID,
‘post_type’ => ‘attachment’,
‘post_mime_type’ => ‘image’
));

if ( empty($images) ) {
// no attachments here
} else {
foreach ( $images as $attachment_id => $attachment ) {
$fullImageURL = wp_get_attachment_image_src( $attachment_id, $size = ‘full’)[0];
// the thumb below is non-standard WP size so I create it manually
$thumbImageURL = str_replace(“.jpg”, “-100×100.jpg”, $fullImageURL);
header(“Link: <” . $fullImageURL . “>; rel=preload; as=image”, false);
header(“Link: <” . $thumbImageURL . “>; rel=preload; as=image”, false);
//echo “<!– ” . $fullImageURL . ” –>\n”;
//echo “<!– ” . $thumbImageURL . ” –>\n”;
}
}
}
}
Then in the theme’s functions.php I added the following at the very bottom:
// support for server push
function is_first_time($cookieURL) {
if (isset($_COOKIE[“$cookieURL”])) {
return false;
} else {
// expires in 30 days.
setcookie(“$cookieURL”, 1, time() + (WEEK_IN_SECONDS * 4), COOKIEPATH, COOKIE_DOMAIN, false);
return true;
}
}
add_action( ‘init’, ‘is_first_time’);
The Results
The results in this image showing the speed improvements. You can see what a drastic improvement the server push implementation provided (2nd drop), but even just the simple act of adding some async, dns-preload and preconnect tag attributes made a substantial difference.


Comments (2)
rel=”dns-prefetch preconnect” doesn’t work in Safari. You need to split it into two elements to maintain compatibility with Safari. (WebKit’s behavior isn’t standards-compliant.)
Thanks Daniel. I appreciate the extra insight.